Monday, September 28, 2015

Goals

Hi,

Here are my goals for the course Game Design in Practice as part of the assignment:
  1. I want to release a game to the public.
  2. Learn more about the work flow when working on a Serious Game
  3. Get better at marketing & producing a game.
  4. I want to improve my programming skills in C# and the Unity Engine.
Here is also a link to the work blog of our new game where we will post updates as the game develops.

It will be a Serious game about rising house prices and banking.


Monday, July 6, 2015

Big Game Project, Final Post

So one month has past since the project ended. So what did we end up with?

We have a working level and I'm happy with what we accomplished in such a short time even though the game is lacking in certain areas like UI functionality and maybe some gameplay mechanics.
I do however like the graphical style of the game and the feeling it gives when played.

The last week of the project I went back to working with the UI again with help of the graphical artists we remade the whole UI. 


The main menu now has 3D text and is a proper menu level. I't still needs some work but is overall quite okay. The buttons in each screen is in different positions and need some more work to have good consistency. It's good custom to place the buttons in the similar area in all screens so the player don't have to look for them as soon as a menu screen is changed. Some tweaking needs to be done with that but It's working for now.

In the actual game we replaced the boring placeholder art for our HUD and we finally added our real UI made looking like background vegetation.

(The old UI)


(The new UI)

The UI seemed to be accepted and used by the players. The experienced players (players who had played 2-3 times) could easily interact with the UI and knew what it all meant.
New players had problems though. almost none of them saw the blinking "C"-Leaf when a level was gained. By clicking the C-Leaf button the character screen opened up so the player could increase the players attributes gained by the new level. If the new player did not see that he missed to increase the stats and was too weak to handle the coming challenges and died easily as a result.

Some players also had problems feeling the sense of danger because of lacking UI interactions with the player when the health was low, In lack of particle effects or visual effects and sound effects. Not much warned the player that just got hit by a "You lose screen" when the health reached zero.

I have learned a lot from this project. one of the biggest lessons is that UI takes A LOT more time than you think. It's not something you just slap onto the game afterwards. It needs to be iterated upon again and again....and again....and then some more and when you think you are done you need to remake the whole thing and work on it some more.


Here are two more screens of what the game looks like in action:
A BIG thank you to my amazing group!


Wednesday, May 6, 2015

Big Game Project, Week 4

Hi,

I'm a bit late with this post but this is for week 4 of the project. So this week (previous week) I was put on handling AI so I have put the menu and HUD stuff on hold for now. So lets dive into behavior trees!


For AI we will use Unreals built in behavior tree. The behavior tree in Unreal is a very big plus for the Unreal engine because it makes this so much more easy because normally when you create behavior trees in code you need to visualise it or draw it down on paper to understand it and here Unreal allows you to build it visually right in the engine. You can also see where in the tree the AI/NPC is at run time by opening the window next to your game. its amazingly good!

For those of you who want to know more about behavior trees in general here is a good link:

http://www.gamasutra.com/blogs/ChrisSimpson/20140717/221339/Behavior_trees_for_AI_How_they_work.php

The tree starts from the top with the root node and works it way down and it starts going to the left branches and works itself down all the way and moves right when it can't move further down. It's kind of like a finite state machine but in a three structure where it chooses different paths in the tree depending on if different conditions are met or not.

My tree is still work in progress and is still very simple. It works something like this:
Do I see an enemy? if yes then attack, if no just wander around. That's basically what the tree does now.

Here is a screenshot of the wander part of my tree.


It first checks if I have a Target (enemy), if not then it will step down to the left and check if I have a TargetLocation to walk to, If not it finds a random spot in a certain radius and sets that as the next TargetLocation. After that it goes to the next task and sets the walking speed to 150. When that is done it returns true all the way up the tree.

Next time this three is run it won't go down to the left because it has a TargetLocation set so it will move done right and move to the TargetLocation. When the TargetLocation is reached it will move back to its starting position, it's HomeLocation. Fairly simple and it works quite well. I didn't choose Unreals built in walk to tasks, I made my own custom walk to tasks that also checks to see if a enemy is spotted while walking and if it is it return false up the tree to trigger the other parts of the tree related to attacks.

One thing that is fairly easy to forget when starting out with behavior trees is that it can be very easy to forget to add both success and fail on tasks when they are done (as seen below). I forgot to put a fail on a task that needed it and the tree got stuck there every time it ran and I couldn't for my life figure out why. Depending on how you build the tree this might be very important and I would say add fail on tasks rather then not adding fail even if it might seem pointless at the time.


In a few days I will write my next post and continue on behavior trees.

Monday, April 27, 2015

Big Game Project, Week 3 - Serialisation and Character Selection

Hi,

This week has been about finishing up the character selection (the programming part) and figuring out how to save and load a game since we will be able to unlock characters we kill in our game so we needed some way to track that as well as all the regular data that needs to be saved like stats on your character and such.


Now the player can choose a character, click the new game button and can then add a name and press play to play as that character.


The game saves the selection and name for the next time the game is played. When the player returns he or she can choose to continue with the saved character or press the new game button.


If the player unlocks a new character in the game it will be available in the menu like this gnome character below. Here you can see that no name is displayed and only the New Game Button is available.


There is quite a lot of code that goes in behind all this...or should I say visual code perhaps since all is done using Unreal's Blueprints. I won't go into all that but I will mention the saving part of this.

First I created a SaveGameObject that holds all the data that needs to be saved. I then added code in our Gamemode Blueprint that handles loading and saving to and from this SaveGameObject.

The first step the GameMode does in it's "Begin Play" Event is checking if a save game file exists on the computer by calling the below function. If it doesn't it creates a SaveGameObject that will use my SavegameObjects data and then save and load that to file. So Unreal has built in functionality for this.

So first "Does Save Game Exists" is called. If a save game file exist it calls "Load Game From Slot" and cast it and set that to my SaveGameObject I created. If it doesn't it calls "Create Save Game Object" and cast it and set it to my SaveGameObject . After that I "Save Game To Slot" to actually save the game to file so I have it there for next time even if no info is added at this point.


Then I have two functions called LoadData and SaveData that basically works similar to the picture above but only do just what the name implies.

Here is a link to Unreal's documentation on the matter: https://docs.unrealengine.com/latest/INT/Gameplay/SaveGame/Blueprints/index.html

A note. I have had some problems with saving data into my SaveGameObject before the actual save is made so I have gotten some strange results and I highly recommend using breakpoints and Print string functions so you see for sure that all data is saved and loaded correctly.

The trouble I had was adding an array of an Actor component to the SaveGameObject which didn't work too well since my SaveGameObject is not an Actor, at least I think that was the problem. I couldn't access the contents of the Actor components so in the end I replaced that with an array of a Blueprint structure to hold all my data instead. It works much better now but its a bit tedious with the structure to access its members and setting them but it works.

If you have any question regarding saving and loading using Unreal's Blueprints feel free to ask by writing a comment.

Friday, April 17, 2015

Big Game Project, Week 2 - GUI

Hi, New week == new blog post.

At the beginning of this week I migrated all the gui stuff I did previous week into the real project. I had to do some tweaks here and there to make it all come together.

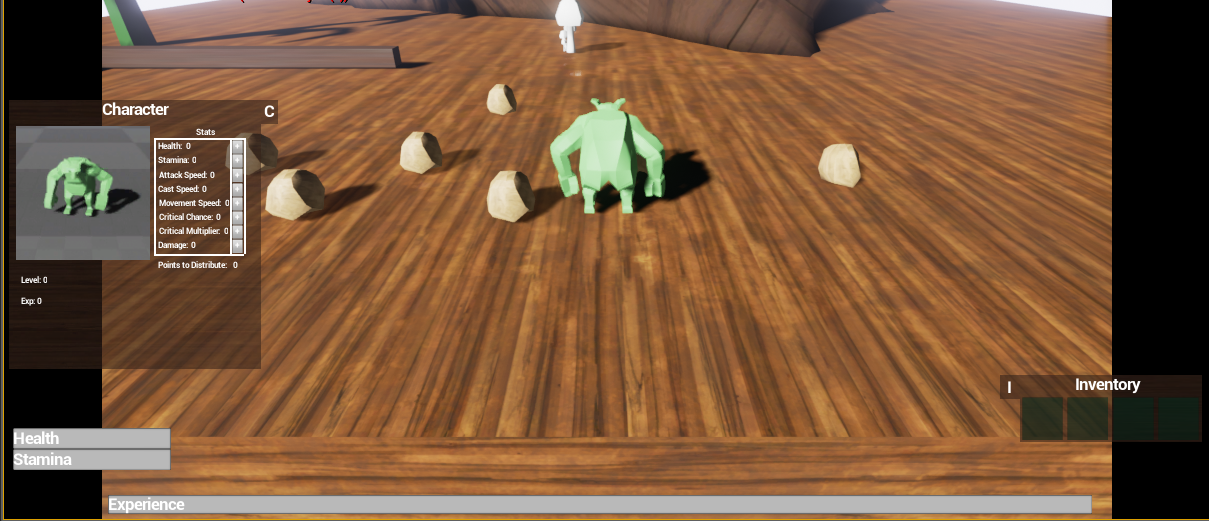
I added functionality in most the gui objects so they hold an image behind all buttons and stuff. So when our talented graphical artists have time to make textures and nice art to the gui I can just slap it on there. As you can see in the picture below I added a Character Panel this week with all the stats.

(All the art you so in all the screenshots are placeholders so its not from the final game.)


(closeup of the character panel)

So in a design perspective I have tested different locations for all the gui elements because I want to design it all so it will be minimalistic so the players main focus will be on the actual environment of the game but its hard to test until we have a playable game.

The Character panel and the inventory can be moved outside the screen. I added a "C" and an "I" on them to show the players how to open them because they will start hidden like the picture below.
When the player either press them with the mouse or with the keyboard they animate out to their final position.

(the black borders on the sides will not be there in game. not sure why they show up sometimes)

I also added so that when you mouse over an object it will show what it is and when you stand close to it you get a different text. This is to let the player know that he can do something with a certain object. Se the text "Stone" and "Pick up Stone" below.


In the middle of the week I used about a day to learn about Unreal's Navmesh navigation system. And I found out that its fairly easy. The only thing I had major problems with was when the character was walking in a certain direction he was looking at the final target and not in the walking direction. To fix this I started out with making stuff rotate left and right to get it right but then found a very easy way to do it. Just set so the character orient its rotation to movement.....Done!
It took med 3 hours and it could have taken just a few seconds if I would have known this one.


And lastly I started working on the start and option menu. We will have a menu were you can choose all the monsters you have defeated and then chose to play as them. This is the start screen with some buttons, Nothing much right now but its work in progress


When you click new game you will be able to play all unlocked characters. You will select them by scrolling them in a circle or something similar.  Below is a screenshot of an idea of how it might look.


If you have any questions of how I did a certain thing please leave a comment below and I will try to answer it as soon as possible.


Sunday, April 12, 2015

Big Game Project, Week 1

This is the first week of the production of a game for our class Big Game Project.
I'm in a group with three other people, Two graphical artists and one other programmer.
I will have the role of a programmer and I chose to not take a lead role in this project so I could focus more on production and learning. The game we make will be a dungeoun crawler with a camera view similar to that of Diablo 2. The motto of the game is play what you kill. So basiclly if you kill an NPC you are allowed to play as that character. The game will be made with Unreal Engine 4.

I have spent this first week to learn the layout of the unreal engine and focusing on working with Unreal's Blueprints. Blueprints is a visual programming tool and you can make a complete game with it without writing a line of code.


How it works is this, It starts of with an event node (Red on screen) or a function node. And from that you draw a white line that is the execution line and then make a new node that does something.
For example. The red node above "Event Begin Play" is run once when the game starts and then the white line goes to "Create PickupText widget" wich creates a component to handle text to the screen in this case.

Everything that follow the white line will be done in that order. I must say it takes some time to grasp all elements in blueprints but there are many helpful tutorials from Unreal and from the community to get you started.

This week I have been focused on lerning the basics of this system while creating a HUD and some GUI elements like an inventory. Here is a screenshot:


In it you see two bars, Health and Speed they don't do anything at this moment other then the visual.
I also created a pill object with a floating text that you can pick up into your inventory.
While in the inventory you can choose to use / consume the pill, drop it or cancel the action.

Next week I will try to migrate some of this into our real project and create some other components for our game.


Sunday, December 21, 2014

Networking (Week 50 + Week 51)

Where do I start?
Well I started with assignment 3 last week, which consists of making a 3D game using DirectX. I became so overwhelmed (and still am) by the task that I basically did nothing for two weeks! Sure I read about programming patterns and networking and I did dibble in some network programming.

So that’s why I have no blog post from last week. I didn’t do anything worth blogging about.  So a few days ago I finally started working on the assignment.
I have made some basic server network code and a packet managing system and I have also merged my code with the code from our teacher Tommi.

I started out with networking because that’s hard to add when the game is already done. So my basic plan is this layout:


So the client or player does something. That is made into a packet of data that is stored in a queue that the packet handler / manager take care of.  
Next step is that this is sent down to the lower network level that actual take care of the sending and receiving data using UDP. So the packet is sent to the server and put into a queue by the packet handler on the server side and then the server reads and handles the data and updates the game logic and creates a new packet and sends it back to the client or to all clients depending on the logic inside.

As you can see in the picture above the client has its on local game logic. This is so the player can still collide and move around in the world without feedback from the server. This so the player don’t have to wait for half a second if a packet is lost along the way.

When the server has handled everything and the packet is back to the client there will be a check if the client position/ state is different from the server’s calculations. If it is then the client will be corrected to the server data.

Each packet is made up of a packet header and the actual data from the client or the server depending on where it’s created. I haven’t created the client side of the network yet so the code is not tested but this is how a header looks like:


The reason I made a header is so I can keep track of who created the packet. What type of packet it is. When it was created and how big it is and if it’s an outgoing or incoming packet. I don’t know if all this is needed but it’s a start and I’m no experienced network programmer.


If you can't read it then just ask me here and I will allow you access.

Monday, December 8, 2014

Planning the next step. (Week 49)


So this week I haven't done much actual programming. I have just been reading up about different programming patterns and I have also been planning about how to create a server solution for the game we need to make in assignment 3.

Making a game with a multiplayer solution is only needed if you aim for a higher grade, which I do.

So I'm reading up about different things to think about when it comes to game networking. I first found this site with an introduction to multiplayer game programming it only explains the basics of how it works on the surface but then I found this new site and it's quite good at explaining the different problems http://gafferongames.com/networking-for-game-programmers/

So after reading that I have a rough plan on how I want to go around this. I will create a Server/client solution with UDP networking because as far as I have understood its far more effective for games with UDP than using TCP protocol, because TCP always need to make sure every packet gets delivered and that can clog up the traffic and in worst case scenarios create lag in the game if the game always have to wait for each packet being delivered.

I have also understood that since UDP just shoots packets like a machine gun and that I need to somehow check what packets I get and when they were sent and check that against the packets I already received because with UDP there is no guarantee that the first packet sent is the first you receive. I need to do this so check so the players will have a smoother gaming experience.

Other stuff I have been reading up on this week is on this site:
http://gameprogrammingpatterns.com/contents.html it’s a must read for anyone who wants to be a serious programmer. I have read through about half of it and it’s really amazing and it’s easy to read and follow the author. I especially like the part about the command pattern and I’m thinking of incorporate that into my programming.

Why you might ask? Well I have always wondered how teams can program in the same programs without getting all tangled up in each other’s code and I have learned from this site about something called decoupling. It’s when you program in a way that all the modules you make can just be put together without really needing to know much about the other components in the program.
 I want to push myself into learning more advanced programming techniques like this and I feel the command pattern is a good place to start.  Found here 

Monday, December 1, 2014

Done with the Web Server! (Week 48)

So I managed to finish my web server. 

When I started coding I managed to get something up and working in a few hours and I blogged about it last week, but then I realized that there was much more to assignment 2 so I got down to business.

First of all I had to figure out how a web browser operates. Something I knew nothing about. My classmate Jonas explained how the browser sends a “GET” request (e.g. GET / HTTP1.1) to the server and how search paths works when you only use your IP-address in the search field of the browser.

Understanding that I managed to get the information sent by the web browser and saved that info into a buffer. From the buffer I could read what kind of things the browser requested and supported.

I started with managing a simple get request.  When someone enters my web server IP-address I answer by sending header information about the server.

http://en.wikipedia.org/wiki/List_of_HTTP_header_fields

Only a few of these header fields has to be included in the header info the server sends. Content type and the content length is something that needs to be included.

The info that is sent has to be EXACTLY correct or the page never finish loading or don’t load at all. I thought it didn’t matter because I only sent strings with text in them.  It took about a week figuring out that this was what caused most of my troubles. This is what I finally included as my header info:


Another big problem I had was to figure out how to handle timeouts or disconnects from the client side. First I went around this problem by just sending information to the client to see if it arrives, like a “ping” but that felt strange to do every loop so I kept looking for other ways and I found this website


explaining that there is no real sure way to know that the client has lost connection unless the server and client are both programmed to handle this. But since I only make the server side I can’t do that.


So I went with just keeping a timer that updates only when a user sends data to the server. If no data is sent for five minutes the server cuts the connection to the client


..…but in our assignment it says that we have to respect the browsers connection header so I extracted the information of the connection status from the web browser that is stored in my receiving data buffer and I set the client to keep alive if it’s a keep alive connection and to closed if it’s a closed connection.


I chose to include both capital and small letters in my control because I noticed that the browsers sent different information.

That’s it for this week. I will start with assignment 3 next week. Making a 3D engine and a game….Alone! so that’s a challenge.


Friday, November 21, 2014

My first Webserver!,*cough*...kind of.

So this week I have been working on assignment 2, making a web server using C++ and Winsock2 API. It went quite well at the start and in basically one day I got a simple server (if you can call it that) that could handle one connection. I received data from the user and I displayed some text in the web browser to the user.


As you can see the browser in the back and in the front is the C++ console that shows the IP address of the user. I also show how many bytes I received and how many I sent. So far so good, but as you can see in the picture there are two new visitors from same IP address, that’s something I need to fix because right now I just grab anything I got, delete it and grab it again for some reason I have yet to figure out. I also I also don't handle time outs correctly and a bunch of other things but I don't care. It's a great feeling just getting something on screen. It made my day!

 Below is part of my main loop. First I had the myServer.listenOnSocket() function inside the loop but after asking our teacher Tommi how the listen() function for Winsock2 works I moved it out from the loop. Apparently the function opens up a listener for sockets that keep listening until closed. So it doesn't need to be in the loop since it keeps listening.


I then call my accept client function and accept the client and creates a client struct that holds all the data of the client, like the IP address and such. After that I call my update client connections which I want to use for updating retrieving and sending data as well as checking for time outs from the clients but I won't show that in detail because it's not working properly yet.

When I built this I thought about going around it like a game loop because a connection to a website/ server is in my mind is always open like a game that is always running.  Today I almost managed to handle multiple connections. The only trouble I have is when one new user connects the other one gets timed out. I'm not sure how to solve that but I will have to do some more code sniffing. So this post isn’t so analytic but I can’t help it because right now I’m just playing around with all the functions in this API trying to figure out how it all works.  Maybe I will dive deeper into this in my next post.

By the way, Last week I mentioned I had some problems with templates. This one:
template<typename T>               //this is the way I tried with no success
class LinkedList<T>;

and:
bool VerifyListErase(LinkedList<T> _List, const std::string& _Message);
Well apparently my error was not how I wrote these. They are all correct. The error was in a completely other place in the code. That’s the difficult thing with templates. I will use them more carefully in the future because the errors you get don’t make sense.


Friday, November 14, 2014

Back to programming!

Finally we started programming again and moved on from all that nonsense of playing board games and whatnot. Part of this course we need to write weekly blogs so I will be more active again.

So in this course we have 3 assignments.

Assignment 1 - Create a linked list and a Binary search tree. (Almost done with this)
Assignment 2 - Consists of writing a webserver
Assignment 3 - Create our own 3D game and engine using DirectX.

So this week I will share my thoughts on Assignment 1. So I actually did create a linked list and a binary search tree a few months ago with the help from youtube, especially from Paul Programming .
It's not very hard. The hard part is keeping track of your pointers.

This week we also learned how to use templates in programming to make our programming more generic. I still have problems using templates in a effective way but I gave it a try and made a linked list and BST (Binary search tree) with templates in mind. at first I got a bunch of errors that made no sense but I fast started to get a hand of how the syntax was supposed to look. Though I'm still struggling with some things, For example when working with normal classes you can forward declare instead of using #include "headername.h" you just write class classname; before the class where you want to use it, so I wrote this:


( class LinkedList;                         //normal way to write a forward declare )

template<typename T>               //this is the way I tried with no success
class LinkedList<T>;


template <typnename T>
class TestModule
{
public:
                  LinkedList();
                  ~LinkedList();

private:
........
........
}

So I still have to figure out how to do that and also another thing I had problem with was how to use another template as a function parameter in a function that is part of class template. Like so:

template <typnename T>
class TestModule
{
public:
bool VerifyListErase(LinkedList<T> _List, const std::string& _Message);

.........
.........
}
If you read this and know how to solve this please feel free to comment below. I will write here again when I find a good solution. It's probably not that hard.
Recursion
So on to what I liked about this week. Recursion! Using recursive functions can be really useful but sometimes they might be tricky to understand. It is basically a function that calls itself within the function creating a loop. 

Below is a search function I wrote that starts the search in the binary search tree from the node that is entered in and search through the whole tree/sub tree for a specific key/data. If a match is found the boolean variable _Match is set to true.


If no match is found the function calls itself and goes to the left and does the whole thing over again until it’s not possible to go left anymore. Then the function moves upwards one step and then tries to go right. It searches through every node until something is found or not found. 

It technically moves through the tree like the red numbers below show. If new to the concept it’s quite hard to grasp so I will try to explain it again.  What happens when a function calls itself is that it goes deeper and deeper until the end and then it returns up one step and does the next instruction. if there is no instruction it goes up another step and checks and so on.

So for example looking at the picture below and starting at 1 the function goes left every iteration until it can't go left more and when number 5 is reached and no match is found the function moves up one step to number 6 and then calls the function again but now with parameter to go right. So it goes to number 7, when nothing is found it moves up to number 8 and then 9 and then goes right again down to 10 and then back up and so on until all nodes have been searched..


If you want to see my code here is a link to Bitbucket. You can use my code freely but if something breaks it’s not my fault. J

Friday, September 26, 2014

Pandemic - Board Game Analysis 2

This week me and my group played another board game and here is the analysis of that game.

The game we chose was Pandemic. It’s played by 2-4 players. The goal of the game is to fight diseases and find cures for them. When all cures are found you win the game. This is done together with the other players where you help each other fighting outbreaks around the world. You play on earth and can move around to different cities in the world. The cities in the world are colored in four different colors. Each color also has a disease with that same color. Before the game start some disease cubes are randomly placed on the board on locations on the infection cards that are drawn before start.

How it’s played

The characters

Each player randomly gets one type of character card describing your special abilities at the start of the game. Those are the scientist, medic, researcher, dispatcher and operational expert. You can see their special abilities in the pictures. So a player can’t choose the role he or she is most comfortable with. This makes the game fair in the way that all get the same chance to play a certain role.


One turn


It’s a turn based game and you have four actions per turn. You can choose to use your actions how you wish. You can move in different ways, fight disease in an area, build a research station, discover a cure or share your knowledge (share cards with other players). How you can play these actions depend on the cards you hold and also your special abilities.

After you have done your actions you draw two player cards which can contain three types of cards, a city card with a color connected to that city, a special event card that basically is a special power card that can be used one time and the epidemic card.

If there are no player cards left in the pile the game is lost.

Then you draw a number of infection cards (depending on the infection rate) The cards show a city and a color and you place one new disease of that color in that city for each card.
If there not enough cubes left to place on the board the players lose the game.
 
City card

The city card has a color and a city name of it. By using this card a player can fly to that location using an action point or the card can be saved for creating a cure for the disease of cards color later on. You can also give these cards to other players. 

Special event card

The special event card can be used any time even if it isn’t your turn and they are all different. With one you can create a research station anywhere in the world, another let you fly a player to any city in the world and so on. 

Epidemic card

If you get the epidemic card some special things happen. First the infection rate is moved one step which might result in the players having to draw more infection cards every round. You then draw a card from the bottom of the infection card pile and place three disease cubes in that city and you then reshuffle all the played infection cards and place them on top of the infection card pile. This will make it so the played infection cards will soon be played again resulting in disease cubes popping up in same cities once more.  This together will easily lead to outbreaks. 

Outbreaks

Outbreaks occur when a disease cube needs to be added to a city and the total amount of cubes in that city exceeds three. Then the disease spread to all adjacent cities with one cube in each of those cities. If one of those cities also exceeds three you get a chain reaction of outbreaks. That’s bad and can make you lose the game quickly because if you get more than seven outbreaks totally in a play through everyone loses the game.


Cures

You can create a cure if you got five cards of the same color and you are in a city with a research station. (The scientist only needs four cards) That disease can after it's been cured be removed by the medic without using action points. When all cubes of that color is removed from the map that disease will never be able to come back and is cured forever.

To win the game you have to create the cure for all four diseases. All disease cubes don't have to be removed though.


The Core system

The core system of this game is moving around the board and removing disease cubes. New disease cubes are placed on the board depending on the epidemic cards and the infection cards. Your job is to treat the infected areas as soon as possible to prevent outbreaks at the same time you need to find a way to create a cure for that disease.

To find a cure you need to constantly have a dialog and work together with the other players. You need to share cards of the right color by being in the same location or maybe build a research station close to a scientist so he can create a cure there. And as a dispatcher you can move around other players so they can meet up in the right place and so on. All the actions a player can do in a turn is shown on the pictures below.


The Good

The balance of the game is amazing. It’s really nerve wrecking. We played a bunch of times and we only won one time but we almost won all other times. Most of the times we were basically only one turn from winning the game. We all found the game entertaining and well balanced. If the game would have been too easy I believe we would only play once or twice and then get tired of it but because it’s so difficult it makes you want to play again and again. You want to beat the game.
When we all learned how to combine our strengths the game got easier and alot more options and strategies were available to us. 

The Bad

This is a tough one. I like the game as it is. I think that the game is very well balanced and I like the core mechanics and how the players need to interact with each other. If I need to think of something that is bad I would say that the player cards are a bit boring. There is not much that happens when you take two player cards except for the epidemic card. I think as an improvement to the game they could add some spice by adding some more random events and story to the player cards or maybe just some more special event cards.  

Interesting system

For me the most interesting system is the randomness of the player characters and the ability to find a cure together. The different attributes of the characters and the way the players constantly need to keep talking strategies to each other to be able to find a cure in time makes this game really interesting. You also need to constantly adapt to the situation. Do I choose to remove some disease in the city where I am or do I help my fellow player the scientist by meeting up with him and sharing knowledge so he can find a cure so the medic in his turn can cure an area from disease. The game is a nice social gaming experience. The cooperative game play is really a breath of fresh air compared to most other games out there where you compete to win against the other players.

To be able to beat this game you need to really learn how to use the strengths of your characters and work together and I believe this is what makes this game so interesting. After playing a few times we saw solutions to certain problems in other ways then just individually moving to a place and removing the disease in that city. The dispatcher for example is really powerful when you learn how to use him in the correct way. He can move other players around the world so they can meet and share cards and so they come up with a cure just in time before the game ends.

Target Group

On the box it says 10 years and up and I believe that’s quite fitting. For young players this can be an educational experience and also at this age I believe the children can start to understand the cooperative parts of the game. I believe that this game aim for a broad group of players at all ages. This is not the game for the competitive person but more so for people who are more of a socializer that likes helping others instead of always winning.


Summary

The game is quite easy to learn and setup. You learn to play it instantly but it takes time to master. It’s when you realize that the more you work together the better the results will be and the higher the chances are for you all to win. Adding so the characters can’t be chosen but are drawn to give some randomness makes you rethink your role in the team. Some players who might have played one role know how to play that good. When they are given another role they then need to rethink when playing. This adds replayability to the game, this and the difficulty level. When you win the game you can increase the difficulty by adding more epidemic cards into the player card pile. This game is nerve wrecking and you feel you are about to win when you suddenly get a chain reaction of outbreaks just messing up your plan and making you all lose the game just before you were about to win. A game takes about 45 minutes to play and I would recomend this game to people who want to try something different.