Wednesday, May 6, 2015

Big Game Project, Week 4

Hi,

I'm a bit late with this post but this is for week 4 of the project. So this week (previous week) I was put on handling AI so I have put the menu and HUD stuff on hold for now. So lets dive into behavior trees!


For AI we will use Unreals built in behavior tree. The behavior tree in Unreal is a very big plus for the Unreal engine because it makes this so much more easy because normally when you create behavior trees in code you need to visualise it or draw it down on paper to understand it and here Unreal allows you to build it visually right in the engine. You can also see where in the tree the AI/NPC is at run time by opening the window next to your game. its amazingly good!

For those of you who want to know more about behavior trees in general here is a good link:

http://www.gamasutra.com/blogs/ChrisSimpson/20140717/221339/Behavior_trees_for_AI_How_they_work.php

The tree starts from the top with the root node and works it way down and it starts going to the left branches and works itself down all the way and moves right when it can't move further down. It's kind of like a finite state machine but in a three structure where it chooses different paths in the tree depending on if different conditions are met or not.

My tree is still work in progress and is still very simple. It works something like this:
Do I see an enemy? if yes then attack, if no just wander around. That's basically what the tree does now.

Here is a screenshot of the wander part of my tree.


It first checks if I have a Target (enemy), if not then it will step down to the left and check if I have a TargetLocation to walk to, If not it finds a random spot in a certain radius and sets that as the next TargetLocation. After that it goes to the next task and sets the walking speed to 150. When that is done it returns true all the way up the tree.

Next time this three is run it won't go down to the left because it has a TargetLocation set so it will move done right and move to the TargetLocation. When the TargetLocation is reached it will move back to its starting position, it's HomeLocation. Fairly simple and it works quite well. I didn't choose Unreals built in walk to tasks, I made my own custom walk to tasks that also checks to see if a enemy is spotted while walking and if it is it return false up the tree to trigger the other parts of the tree related to attacks.

One thing that is fairly easy to forget when starting out with behavior trees is that it can be very easy to forget to add both success and fail on tasks when they are done (as seen below). I forgot to put a fail on a task that needed it and the tree got stuck there every time it ran and I couldn't for my life figure out why. Depending on how you build the tree this might be very important and I would say add fail on tasks rather then not adding fail even if it might seem pointless at the time.


In a few days I will write my next post and continue on behavior trees.

Monday, April 27, 2015

Big Game Project, Week 3 - Serialisation and Character Selection

Hi,

This week has been about finishing up the character selection (the programming part) and figuring out how to save and load a game since we will be able to unlock characters we kill in our game so we needed some way to track that as well as all the regular data that needs to be saved like stats on your character and such.


Now the player can choose a character, click the new game button and can then add a name and press play to play as that character.


The game saves the selection and name for the next time the game is played. When the player returns he or she can choose to continue with the saved character or press the new game button.


If the player unlocks a new character in the game it will be available in the menu like this gnome character below. Here you can see that no name is displayed and only the New Game Button is available.


There is quite a lot of code that goes in behind all this...or should I say visual code perhaps since all is done using Unreal's Blueprints. I won't go into all that but I will mention the saving part of this.

First I created a SaveGameObject that holds all the data that needs to be saved. I then added code in our Gamemode Blueprint that handles loading and saving to and from this SaveGameObject.

The first step the GameMode does in it's "Begin Play" Event is checking if a save game file exists on the computer by calling the below function. If it doesn't it creates a SaveGameObject that will use my SavegameObjects data and then save and load that to file. So Unreal has built in functionality for this.

So first "Does Save Game Exists" is called. If a save game file exist it calls "Load Game From Slot" and cast it and set that to my SaveGameObject I created. If it doesn't it calls "Create Save Game Object" and cast it and set it to my SaveGameObject . After that I "Save Game To Slot" to actually save the game to file so I have it there for next time even if no info is added at this point.


Then I have two functions called LoadData and SaveData that basically works similar to the picture above but only do just what the name implies.

Here is a link to Unreal's documentation on the matter: https://docs.unrealengine.com/latest/INT/Gameplay/SaveGame/Blueprints/index.html

A note. I have had some problems with saving data into my SaveGameObject before the actual save is made so I have gotten some strange results and I highly recommend using breakpoints and Print string functions so you see for sure that all data is saved and loaded correctly.

The trouble I had was adding an array of an Actor component to the SaveGameObject which didn't work too well since my SaveGameObject is not an Actor, at least I think that was the problem. I couldn't access the contents of the Actor components so in the end I replaced that with an array of a Blueprint structure to hold all my data instead. It works much better now but its a bit tedious with the structure to access its members and setting them but it works.

If you have any question regarding saving and loading using Unreal's Blueprints feel free to ask by writing a comment.

Friday, April 17, 2015

Big Game Project, Week 2 - GUI

Hi, New week == new blog post.

At the beginning of this week I migrated all the gui stuff I did previous week into the real project. I had to do some tweaks here and there to make it all come together.

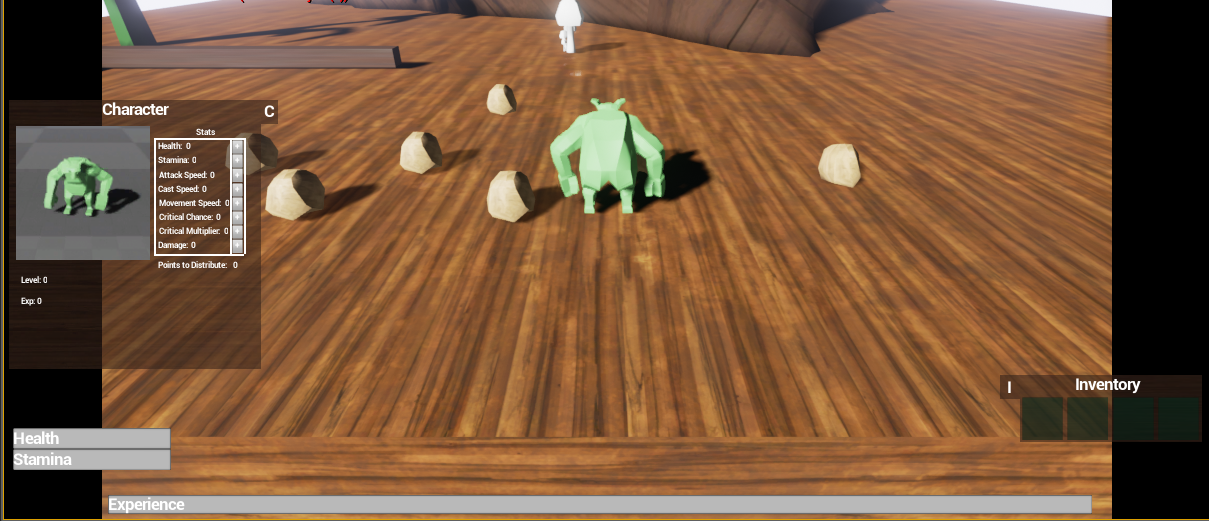
I added functionality in most the gui objects so they hold an image behind all buttons and stuff. So when our talented graphical artists have time to make textures and nice art to the gui I can just slap it on there. As you can see in the picture below I added a Character Panel this week with all the stats.

(All the art you so in all the screenshots are placeholders so its not from the final game.)


(closeup of the character panel)

So in a design perspective I have tested different locations for all the gui elements because I want to design it all so it will be minimalistic so the players main focus will be on the actual environment of the game but its hard to test until we have a playable game.

The Character panel and the inventory can be moved outside the screen. I added a "C" and an "I" on them to show the players how to open them because they will start hidden like the picture below.
When the player either press them with the mouse or with the keyboard they animate out to their final position.

(the black borders on the sides will not be there in game. not sure why they show up sometimes)

I also added so that when you mouse over an object it will show what it is and when you stand close to it you get a different text. This is to let the player know that he can do something with a certain object. Se the text "Stone" and "Pick up Stone" below.


In the middle of the week I used about a day to learn about Unreal's Navmesh navigation system. And I found out that its fairly easy. The only thing I had major problems with was when the character was walking in a certain direction he was looking at the final target and not in the walking direction. To fix this I started out with making stuff rotate left and right to get it right but then found a very easy way to do it. Just set so the character orient its rotation to movement.....Done!
It took med 3 hours and it could have taken just a few seconds if I would have known this one.


And lastly I started working on the start and option menu. We will have a menu were you can choose all the monsters you have defeated and then chose to play as them. This is the start screen with some buttons, Nothing much right now but its work in progress


When you click new game you will be able to play all unlocked characters. You will select them by scrolling them in a circle or something similar.  Below is a screenshot of an idea of how it might look.


If you have any questions of how I did a certain thing please leave a comment below and I will try to answer it as soon as possible.


Sunday, April 12, 2015

Big Game Project, Week 1

This is the first week of the production of a game for our class Big Game Project.
I'm in a group with three other people, Two graphical artists and one other programmer.
I will have the role of a programmer and I chose to not take a lead role in this project so I could focus more on production and learning. The game we make will be a dungeoun crawler with a camera view similar to that of Diablo 2. The motto of the game is play what you kill. So basiclly if you kill an NPC you are allowed to play as that character. The game will be made with Unreal Engine 4.

I have spent this first week to learn the layout of the unreal engine and focusing on working with Unreal's Blueprints. Blueprints is a visual programming tool and you can make a complete game with it without writing a line of code.


How it works is this, It starts of with an event node (Red on screen) or a function node. And from that you draw a white line that is the execution line and then make a new node that does something.
For example. The red node above "Event Begin Play" is run once when the game starts and then the white line goes to "Create PickupText widget" wich creates a component to handle text to the screen in this case.

Everything that follow the white line will be done in that order. I must say it takes some time to grasp all elements in blueprints but there are many helpful tutorials from Unreal and from the community to get you started.

This week I have been focused on lerning the basics of this system while creating a HUD and some GUI elements like an inventory. Here is a screenshot:


In it you see two bars, Health and Speed they don't do anything at this moment other then the visual.
I also created a pill object with a floating text that you can pick up into your inventory.
While in the inventory you can choose to use / consume the pill, drop it or cancel the action.

Next week I will try to migrate some of this into our real project and create some other components for our game.


Sunday, December 21, 2014

Networking (Week 50 + Week 51)

Where do I start?
Well I started with assignment 3 last week, which consists of making a 3D game using DirectX. I became so overwhelmed (and still am) by the task that I basically did nothing for two weeks! Sure I read about programming patterns and networking and I did dibble in some network programming.

So that’s why I have no blog post from last week. I didn’t do anything worth blogging about.  So a few days ago I finally started working on the assignment.
I have made some basic server network code and a packet managing system and I have also merged my code with the code from our teacher Tommi.

I started out with networking because that’s hard to add when the game is already done. So my basic plan is this layout:


So the client or player does something. That is made into a packet of data that is stored in a queue that the packet handler / manager take care of.  
Next step is that this is sent down to the lower network level that actual take care of the sending and receiving data using UDP. So the packet is sent to the server and put into a queue by the packet handler on the server side and then the server reads and handles the data and updates the game logic and creates a new packet and sends it back to the client or to all clients depending on the logic inside.

As you can see in the picture above the client has its on local game logic. This is so the player can still collide and move around in the world without feedback from the server. This so the player don’t have to wait for half a second if a packet is lost along the way.

When the server has handled everything and the packet is back to the client there will be a check if the client position/ state is different from the server’s calculations. If it is then the client will be corrected to the server data.

Each packet is made up of a packet header and the actual data from the client or the server depending on where it’s created. I haven’t created the client side of the network yet so the code is not tested but this is how a header looks like:


The reason I made a header is so I can keep track of who created the packet. What type of packet it is. When it was created and how big it is and if it’s an outgoing or incoming packet. I don’t know if all this is needed but it’s a start and I’m no experienced network programmer.


If you can't read it then just ask me here and I will allow you access.

Monday, December 8, 2014

Planning the next step. (Week 49)


So this week I haven't done much actual programming. I have just been reading up about different programming patterns and I have also been planning about how to create a server solution for the game we need to make in assignment 3.

Making a game with a multiplayer solution is only needed if you aim for a higher grade, which I do.

So I'm reading up about different things to think about when it comes to game networking. I first found this site with an introduction to multiplayer game programming it only explains the basics of how it works on the surface but then I found this new site and it's quite good at explaining the different problems http://gafferongames.com/networking-for-game-programmers/

So after reading that I have a rough plan on how I want to go around this. I will create a Server/client solution with UDP networking because as far as I have understood its far more effective for games with UDP than using TCP protocol, because TCP always need to make sure every packet gets delivered and that can clog up the traffic and in worst case scenarios create lag in the game if the game always have to wait for each packet being delivered.

I have also understood that since UDP just shoots packets like a machine gun and that I need to somehow check what packets I get and when they were sent and check that against the packets I already received because with UDP there is no guarantee that the first packet sent is the first you receive. I need to do this so check so the players will have a smoother gaming experience.

Other stuff I have been reading up on this week is on this site:
http://gameprogrammingpatterns.com/contents.html it’s a must read for anyone who wants to be a serious programmer. I have read through about half of it and it’s really amazing and it’s easy to read and follow the author. I especially like the part about the command pattern and I’m thinking of incorporate that into my programming.

Why you might ask? Well I have always wondered how teams can program in the same programs without getting all tangled up in each other’s code and I have learned from this site about something called decoupling. It’s when you program in a way that all the modules you make can just be put together without really needing to know much about the other components in the program.
 I want to push myself into learning more advanced programming techniques like this and I feel the command pattern is a good place to start.  Found here 

Monday, December 1, 2014

Done with the Web Server! (Week 48)

So I managed to finish my web server. 

When I started coding I managed to get something up and working in a few hours and I blogged about it last week, but then I realized that there was much more to assignment 2 so I got down to business.

First of all I had to figure out how a web browser operates. Something I knew nothing about. My classmate Jonas explained how the browser sends a “GET” request (e.g. GET / HTTP1.1) to the server and how search paths works when you only use your IP-address in the search field of the browser.

Understanding that I managed to get the information sent by the web browser and saved that info into a buffer. From the buffer I could read what kind of things the browser requested and supported.

I started with managing a simple get request.  When someone enters my web server IP-address I answer by sending header information about the server.

http://en.wikipedia.org/wiki/List_of_HTTP_header_fields

Only a few of these header fields has to be included in the header info the server sends. Content type and the content length is something that needs to be included.

The info that is sent has to be EXACTLY correct or the page never finish loading or don’t load at all. I thought it didn’t matter because I only sent strings with text in them.  It took about a week figuring out that this was what caused most of my troubles. This is what I finally included as my header info:


Another big problem I had was to figure out how to handle timeouts or disconnects from the client side. First I went around this problem by just sending information to the client to see if it arrives, like a “ping” but that felt strange to do every loop so I kept looking for other ways and I found this website


explaining that there is no real sure way to know that the client has lost connection unless the server and client are both programmed to handle this. But since I only make the server side I can’t do that.


So I went with just keeping a timer that updates only when a user sends data to the server. If no data is sent for five minutes the server cuts the connection to the client


..…but in our assignment it says that we have to respect the browsers connection header so I extracted the information of the connection status from the web browser that is stored in my receiving data buffer and I set the client to keep alive if it’s a keep alive connection and to closed if it’s a closed connection.


I chose to include both capital and small letters in my control because I noticed that the browsers sent different information.

That’s it for this week. I will start with assignment 3 next week. Making a 3D engine and a game….Alone! so that’s a challenge.